Tag: meringue

REPOST – General Satisfaction

Pop quiz hotshots…

General Satisfaction is:

a) A minor character in the Stanley Kubrik classic Doctor Strangelove,

b) A new character in the game Clue / Cluedo. ” It was General Satisfaction in the billiard room.  With the Candlestick” or,

c) A Victorian nursery pudding with the most awesome name ever?

General Satisfaction

I made this to take to my family on Christmas day and let me tell you…general satisfaction became major happiness as people tucked in.  And who would not be happy with this mix of lemony berries, topped with sponge finger biscuits liberally soaked in limoncello, topped with a lovely lemony custard and then baked with a meringue topping?

Yep.  It’s like you’ve died and gone to heaven….

One of the side effects of the Paleo diet is that I seem to have become hyper-sensitive to sugar.  The first version I made of this was so sweet I actually couldn’t eat it,  Someone else in the house had no such qualms.  He’s lying in a diabetic coma as we speak.

My first introduction to General Satisfaction came from recipe came from Tamasin Day-Lewis’ Supper for A Song .  There is also this version online:

General Satisfaction

I “unsweetened” this by swapping out the jam for a slightly more tart lemon curd and adding some fresh (frozen) berries into the base mix.  I also added some limoncello to the custard mix. Just because…name me one thing that isn’t made better by a liberal splash o’ booze.  And you know, it is the season….

General Satisfaction

It was still pretty sweet though.

This is at it’s best straight out of the oven with the custard runny and the meringue all crispy. However the last few pieces were also pretty good at room temperature a few days later as part  of an afternoon tea.

General Satisfaction

And if you make this, true to it’s name, I promise you will not be disappointed!!!

I am also interested to know what are most kookiest food names you have come across? General  Satisfaction must be right up there but I would love to know yours!!!

General Satisfaction 3Wishing you and yours not only general satisfaction but super happy fun times for 2015.  May it also be the year you learn to stop worrying…

Signature 1 Vintage Valentine Quick as Wink2

Print

General Satisfaction

A lovely tangy take on a Victorian nursery pudding.

Ingredients

Scale
  • 1 level tbsp cornflour
  • 425g full cream milk
  • 1 vanilla pod, split, seeds scraped (or 1 tbsp vanilla essence)
  • 3 large eggs, separated
  • 5 tbsp caster sugar
  • 170g lemon curd
  • 1 cup mixed berries, thawed if using frozen
  • 1 tbsp warm water
  • 1/4 cup limoncello, maybe a bit more….
  • 1012 savoiardi or sponge finger biscuits

Instructions

  1. Preheat oven to 180c.

For The Custard

  1. Mix the cornflour with 1 tbsp milk.
  2. Pour the milk into a small, heavy saucepan. Add the vanilla seeds, empty pod and cornflour mix.
  3. Bring to the boil, stirring then drop the heat and simmer, still stirring for a coupe of minutes. Remove from the heat.
  4. Whisk the egg yolks in a bowl then whisk in a tablespoonful of the milk mixture. Repeat three times then pout the combined egg and milk mixture into the warmed milk.
  5. Set the pan back over low heat, and whisk until the custard thickens and is perfectly smooth. Don’t let it boil. Remove from the heat, and whisk in 2 tablespoon of the sugar and half of the limoncello. Set aside to cool.

For The Lemon Berry Sauce

  1. Mix the lemon curd with 1 tbsp of just boiled water until runny and pour into the base of a medium baking dish.
  2. Scatter the berries over the curd then press them down with a potato masher to flatten them down a bit and get their juices running.
  3. Lay the savoiardi on top of the curd and berry mix and sprinkle with the remaining limoncello.
  4. Poor the cooled custard over the biscuits, straining if it is lumpy.

For The Meringue

  1. Whisk the egg whites until stiff, then whisk in the remaining sugar, little by little until you have a firm shiny meringue.
  2. Spoon the meringue over the custard.
  3. Bake on the middle shelf of the oven for about 20 minutes until the meringue is pale golden and crisp when you tap it.

Notes

  • Adding a little bit of the milk to the egg, prevents the egg from cooking.

The Crown Princess Victoria’s Birthday Cake

Can you believe I’ve been doing this for 6 years?  Who knew this was going to last longer than most proper jobs,  many romantic relationships and a large percentage of prison sentences!

This is a belated celebration though because I’m having a horrendous month.  First I hurt my back and was out of action for a couple of weeks.  And now I have an awful cold.

But better late than never!  And if we were going to wait for anything?  This might be the one! 

This is the Crown Princess Victoria’s birthday cake!

Crown Princess Victoria Birthday Cake

Time sure flies when you decide to follow your own brand of weirdness!

But let’s talk about this cake.  Because it’s not quite cake as we know it.  I also need to confess that I have no idea where this recipe came from.  I copied it out of a  book but totally forgot to note the book from whence it came. So, if anyone knows, please drop me a line so I can attribute it properly!

It’s also gluten-free for those of you who care about those sorts of things!

First up you need to start with two layers of nutty biscuit base.  The original recipe said walnut but I had almond meal in the house so rather than grinding walnuts into meal, I took the lazy girl’s option and used what I had.  (In my defence I also had a bad back at the time.  😉 ).  

And haters look out, I also thought it would work better with an almond base seeing as I was going to decorate it with marzipan.  It was going to be a double almond delight!

Next up a meringue!

Crown Princess Victoria Birthday Cake

Then meringue was sandwiched with whipped cream between the two almond discs.  This is where it got a little crazy because the meringue was round on the top and the discs were not.  So the sandwiching was a little rough…

Crown Princess Victoria Birthday Cake The the “cake” was “iced” with more whipped cream and decorated with fresh raspberries and some marzipan roses!

Crown Princess Victoria Birthday Cake3

This looked so pretty and was absolutely delicious.  The crisp biscuit, the crunchy outside of the meringue and the marshmallowy inside made for a lovely blend of textures. The raspberries added a cake much-needed tang into the overall sweetness of the cake and whipped cream just makes anything a party!

Crown Princess Victoria Birthday Cake

Here’s the recipe:

Print

The Crown Princess Victoria’s Birthday Cake

A different and delicious “cake” to celebrate any occasion.

Ingredients

Scale

For The Biscuit Layers

  • 1 1/4 cups almond meal
  • 1/4 cup icing sugar
  • 2 egg whites

For The Meringue Layer

  • 2 egg whites
  • 1/2 cup caster sugar

To Decorate

  • 1 1/2 cups whipped cream
  • 250g fresh raspberries
  • Fondant or marzipan roses

Instructions

For the Bicuit Layers

  1. Mix together the almond meal, icing sugar and the unbeaten egg whites.Spread out into 2 x 20cm rounds on baking paper on baking trays.
  2. Bake in a moderate oven for 10 minutes until firm to touch.
  3. Turn out onto wire racks and carefully peel off the paper.
  4. Cool.

For The Meringue

  1. Beat the 2 eggs whites until stiff.
  2. Add the sugar gradually, beating all the time until glossy and thick.
  3. Spread out to a 20cm round on baking paper on a baking tray.
  4. Bake in a slow oven until dry and crisp – around 45-50 minutes.
  5. Cool and carefully remove paper.

To Decorate

  1. Sandwich the meringue between the two biscuit layers with whipped cream.
  2. Cover the top and sides with whipped cream.
  3. Decorate with raspberries and fondant or marzipan roses.

You can find an article on how to make proper marzipan roses here.  Or you can muddle through and hope for the best like I did with mine!

Crown Princess Victoria Birthday Cake

And of course, I couldn’t let the moment go by without reference to this!

Have a wonderful week everyone!

Signature 1 Vintage Valentine Quick as Wink2
 

Nutty Nutella Cake… with a Meringue Topping

Just as we finish a good meal with something sweet, so shall we round out the month of madness with one of the kookiest recipes I’ve seen lately.  And here it is:

Nutty Nutella Cake
Nutty Nutella Cake

Looking at that photo, I know what you are thinking.  And you know what?

Some of you are mean!!!!

Have you been taking lessons from my family?

So these are not the best looking cakes in the world.  There is a definite dip in middle of all of them.  The texture is kind of rough….then again….that rough texture is also kind of crispy and there is a delicious fudgy layer in the middle. And who doesn’t love a fudgy layer?

Nutty Nutella Cake2
Nutty Nutella Cake2

But remember the Twinkie Defence?  I’m about to launch the Picnic Defence. The Picnic is one of the best chocolate bars ever. Chocolate, caramel, wafer, peanuts.  So good.  The only problem?  It looks like a big old turd.


But so good to eat.

And the Nutty Nutella Cake is the Picnic bar‘s next door neighbour in “Dammit we taste so much better than we look” Street.

You know what else makes this cake so special?  I’ll tell you in a moment but first, let’s take a walk down Pronunciation Avenue and talk about Nutella.  In Australia ( and I believe England), we call this super delicious chocolate hazelnut spread Nut-ella.  Because it’s made of nuts.  And….ella.  Ella being an Italian euphemism for a shit ton of sugar.

However, definitely on The Splendid Table Podcast and I’m sure a few others I listen to, I have heard Americans call this stuff Noo-tella.

WTF?  I can get over that whole tomato / tomayto thing.  But Noo-tella is a step too far.
It’s NUT-ella.  End of.

Nutella Cake3
Nutella Cake3

I first found this recipe on the Masterchef site.  However, it has since been taken down.  Only a picture remains. And yep, phew…Matt Preston’s cake is as ugly as mine…

http://tenplay.com.au/channel-ten/masterchef/recipes

Possibly even uglier.

But I was able to find a copy in Matt Preston’s latest book and in the same spirit of adventure in which I made muffins from ice cream and flour a few years back I decided to give it a whirl.  And you know what else….there’s obviously some weird psychic connection between Matty P, and me because in the same book, he has a recipe for “bread” made from you guessed it, ice cream and flour!

So, you wanna know what’s in these ugly but delicious sweet treats?

Nutella Cake Ingredients
  • Nutella…or if you’re cheap like me, supermarket brand hazelnut spread.
  • Eggs
  • Vanillla

That’s all folks.  C’est tout.  Three ingredients.  To get this….

Nutella Cake 4
Nutella Cake 4

And you know what?  That little dip….don’tcha just want to fill it up with all sorts of deliciousness?

I went for a contrast – still warm cake with some of my ancho berry sorbet and a couple of leaves of chocolate mint – direct from the garden!!!

Nutella Cake and Ancho Sorbet 1

But you could have any flavour of ice cream, or some salted caramel sauce..or even some normal frosting…

DSC02387Or what if you added a big dollop of nutella into the dip and then made a meringue over it?  OMG.  I am so making that….stay right here.  I”ll be back…..

Just got to fill these cakes….

Filled Nutella Cakes

Then whip up a meringue….

Meringue top
Meringue top

And bung ’em in the oven for a bit….

And then…..

Meringue Topped Nutella Cake

I am giggling like a little girl and dancing round my kitchen.  My, face, my hands, my camera are all smeared with chocolate and meringue and am feeling both a little nauseous and like I have died and gone to heaven….

We only had three of the cakes left and I have just eaten two of them….they were that good!!!!

Scuse the fingers….but you’re lucky there are any photo’s I was so busy shoving these into my gob taste-testing to ensure the highest possible quality standards.

Nutella Meringue Cake2

And look at that…the light as air toasty on top meringue, the oozy melty nutella and the cakey base….

What a way to end the month!!!!

I am racing to get this out because I am heading up to the sunshiney Gold Coast very early tomorrow morning for a couple of days – sadly mostly work and not much play – but by the time I can post again it will be February….which is as scary as hell.  Where did January go????

Have a great week where ever you are and what ever you get up to.


Signature 1 Vintage Valentine Quick as Wink2


Print

Nutella Meringue Cake

A delicious chocolate cake with a base of three ingredients. Good by itself or topped with your favourite flavours for a super delicious treat!

Ingredients

Scale

For the Cake

  • 4 large eggs
  • 240g Nutella or chocolate hazelnut spread of your choice
  • 1 tsp vanilla

For the topping

  • Additional Nutella – 1 tsp per cake
  • 3 eggs
  • 1 1/2cup of sugar

Instructions

For the cake

  1. Preheat the oven to 175C.
  2. Lightly grease your cupcake liners and place in a tray.
  3. In a large bowl, whisk the eggs on top speed until they have tripled in size (approx 6 minutes but this will depend on the power of your mixer).
  4. Place the Nutella in a metal bowl with the vanilla extract and stir over a pan of boiling water until the Nutella softens. (You can also do this in a microwave – use a microwave safe bowl and heat for 1 minute, stirring every 15 seconds).
  5. Turn the mixer down to low and drop spoonfuls of Nutella into the egg mixture. Repeat until all the nutella has been added and the Nutella is completely mixed in.
  6. Scrape down the sides and bottom of the mixing bowl with a spatula to ensure there is no Nutella sticking to them and stir a few times by hand.
  7. Pour the Nutella mixture into the prepared cases, filling them about 3/4 full.
  8. Bake for approx 15-20 minutes until a skewer inserted into a cake comes out clean.
  9. The cakes will look lovely and round when they come out of the oven but they will collapse as they cool.
  10. Once cool, add a spoonful of Nutella into each dip.

For the Meringue

  1. Separate the eggs and place the whites in a clean, dry bowl.
  2. Beat until the mixture forms stiff peaks.
  3. Gradually add the sugar and beat until the mixture is thick and glossy.
  4. Spoon or pipe this mixture onto the cakes.
  5. Place under preheated grill for 1-2 minutes or until lightly toasted. Alternatively, use a culinary blow torch to lightly grill the meringue

Notes

  • This cake is also great topped with a scoop of your favourite icecream, would be awesome with a salted caramel, berries and cream etc.
  • I used a coconut oil spray to grease the cupcake liners which added the slightest hint of coconut to my cakes.
  • The meringue quantities above will cover an entire batch of cupcakes.


Retro Food For Modern Times: Three Sweet Treats inspired by a Luscious Liqueur

I was recently strolling around my local purveyor of fine alcoholic beverages (or as we like to call  it, our second home) when a retro looking bottle caught my eye.   A very glamorous  Elke Sommer looking woman is being draped in a fur coat by a man who looks like a  1970’s tennis player or a porn star (possibly both).  The label promised  “an experience of elegance and lingering pleasure” which only further reinforced the boom chicka wah wah soundtrack that was going through my head.  The name: Kellermeister Sable.  According to the back of the bottle, Sable is a

“base of  ruby tawny into which we have steeped dark German Chocolate, special spices and three year old brandy”

You know those moments when Homer Simpson goes into the donut fugue state?  I think I lapsed into something very similar.  Standing there mumbling to myself  “Ruby Tawny…dark chocolate….special spices….brandy…ruby tawny…..”  Ruby Tawny may well become the name of my first-born child.  I hope it’s a girl.

The bottle, in all it’s gorgeous  retroness did give me pause though.  I honestly wasn’t sure if it was meant to be retro chic.  Or it just came from South Australia.  If anyone from South Australia wants to dispute the implication of this statement  I suggest they first go and count the people with mullets walking down Rundle Mall.  They can lodge their complaints when they have a number less than ten.  

Ok, we may have lost South Australia forever so the rest of us might as well get on with it.    Sable is meant to be retro chic and forms part of the Kellermeister Retro Range which includes this and two Moscatos which I am very keen to try.  One is called Pink Minx.  This may become the name of my second born child. Again, a girl would be good.

The Sable is great on it’s own as a little tipple – rich, silky, porty, chocolatey loveliness in a glass.  If I was prone to swooning I would.  However, as I do not live in a Jane Austen novel  I will remain upright and advise that this is utterly delicious and is likely to become a staple on my drinks trolley for some time to come!  This will be my go to product for those days when you just want a little something sweet and lovely after dinner! Or mid afternoon….or…you know…whenever….

The loveliness of the Sable does not stop with drinking though.  It is equally good in food.

I’ve now made three recipes with it and they were all gorgeous (even if I do say so myself).  If you cannot get Sable, your liqueur of choice can be substituted in all of these.

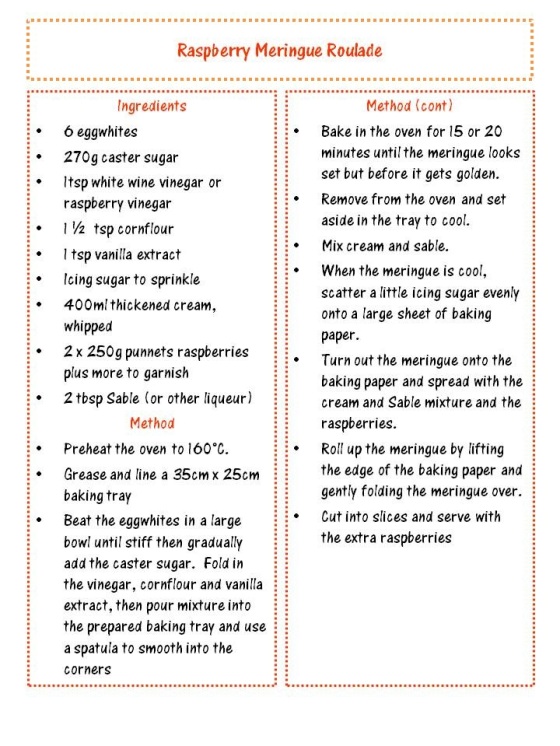
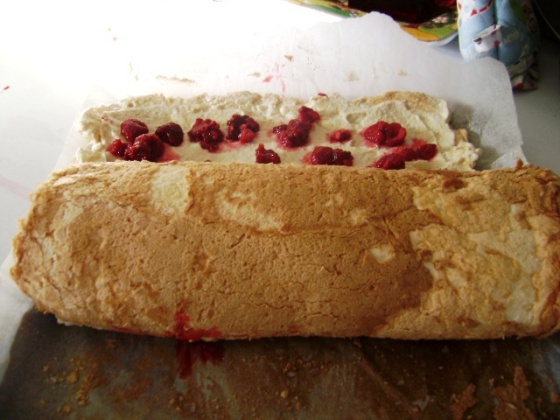
First up was a Raspberry Meringue Roulade  which I adapted from a Bill Granger recipe.

Raspberry Meringue Roulade

Rolling, Rolling, Rolling

Raspberry Roulade and a glass of Sable – a lovely afternoon tea tipple

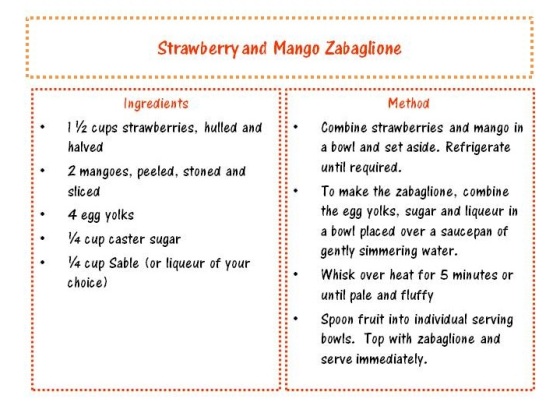
I then made a Strawberry and Mango Zagablione where I used the Sable instead of marsala.   This tasted divine!   The zabaglione was also lovely swirled into some plain yoghurt the following day.

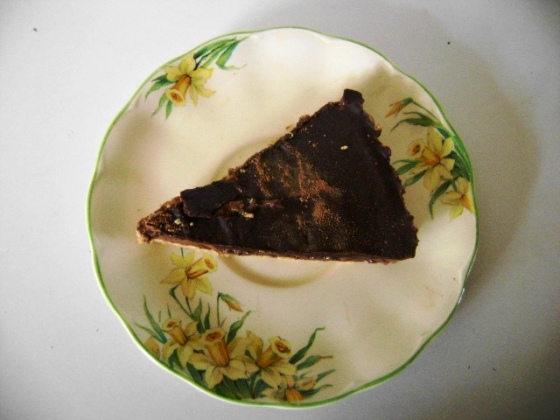
Finally, I used some Sable  in my version of the Australian Gourmet Traveller Chocolate and Caramel Tart. I adapted the original recipe as I am not that good with pastry and I used a bought caramel.  This is a truly decadent recipe and tastes like heaven!  My only word of caution is give yourself plenty of time to make this.  I started mid afternoon.  I added the final layer at midnight.  This takes a LONG time to make as you have to let each layer chill before adding  the next one.  It is worth it though as this is absolutely delicious!

I love the ombre effect of the four layers!

I

Enjoy!